


Clash of Critters Horde Invasion is the most demanding co-op event in the game—and it's a lot more strategic than it sounds. Getting through the first few waves is easy, but surviving the later stages—especially the double boss encounters—is a genuine test of teamwork, positioning, and preparation.
This mode isn't about one perfect burst window. It's about surviving repeated pressure without your board unraveling. If you want to consistently hit 900 to 1,000 kills, you need to understand the mechanics, the best Tatari to bring, and how to coordinate with your teammate.
In this guide, we'll break down everything you need to know: how the mode works, the wave structure, the best Tataris by role, the chip system, and advanced strategies to push deeper into the invasion.
How Horde Invasion Works

Horde Invasion is a co-op mode accessed from your Camp. You can invite a friend or match with a random player.
The event runs on a rotation system. Currently, the invasion window lasts 3 hours, followed by a cooldown period. During each window, you have a limited number of attempts—typically 3 rounds per session.
Important: Your score is based on your highest single run, not your cumulative score. One outstanding performance matters far more than three average ones. You can play multiple times during each active window, but daily ranking rewards are only awarded once—if you place higher on a later attempt, you receive the difference in rewards.
Camp Management Warning: If your camp—or your teammate's camp—is attacked during the event, you won't be able to interact with it until the invasion ends. Plan your camp upgrades around the event schedule.
Difficulty System (Season 1)
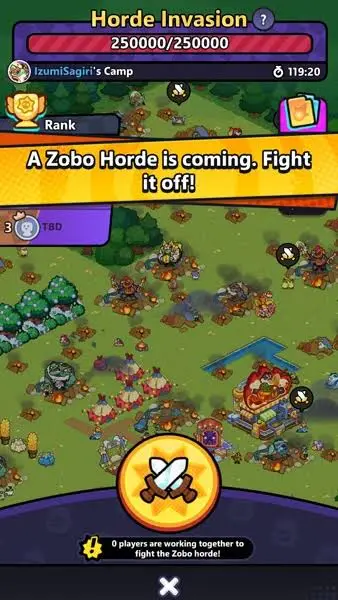
Season 1 introduced a multi-difficulty system. Players start at Difficulty 1 and must clear the required kills before unlocking the next level. There are currently four main difficulties, each with a target of approximately 750 kills.
The progression works as follows:
- Start with Difficulty 1
- Clear 750 kills → Unlock Difficulty 2
- Complete Difficulty 2 → Unlock Difficulty 3
- Continue to Difficulty 4 (the final major difficulty before endless mode)
- After reaching the highest difficulty, continue pushing for higher scores
The first two difficulties are manageable with a developed team. Difficulties 3 and 4 are significantly more demanding, with tougher enemy waves and boss combinations.
Leaderboard and Rankings
Rankings are based on both kills and difficulty. A player with 10 kills on Difficulty 4 will rank higher than a player with 745 kills on Difficulty 3. Seasonal leaderboards track your highest completed difficulty and kill count, with exclusive rewards including avatar frames for top performers.
Rewards
Horde Invasion rewards include:
- Pinballs (awarded per wave with a daily limit)
- Candy
- Tatari Capsules
- Avatar Frames for seasonal rankings
Wave Structure and Boss Encounters
35-Wave Format (Original)
The original Horde Invasion consists of 35 successive waves. The first few waves are relatively easy, but from Wave 20 onward, you'll face two bosses simultaneously.
Here are the key boss encounters:
|
Wave |
Boss(es) |
Boss Element |
Counter Element |
|
10 |
Volcano Zobo |
Fire |
Water |
|
20 |
Shaman Zobo ×2 |
Grass |
Fire |
|
25 |
Climber Zobo ×2 |
Rock |
Grass |
|
30 |
Sandworm Zobo + Clown Zobo |
Rock, Lightning |
Grass, Rock |
|
35 |
Climber Zobo + Garden Zobo |
Rock, Grass |
Grass, Fire |
Elemental coverage is the core of this event. Boss Zobos each have specific weaknesses, and waves cycle through all five elements (Water, Fire, Grass, Rock, Lightning). A team that consistently covers at least three elements can handle most mid-wave encounters without constant swapping.
25-Wave Format (Season 1 Update)
Season 1 shortened the run to approximately 25 waves. This makes individual battles shorter while still giving enough time to build scores. Notable changes include:
- Worm teleport mechanic appears at Wave 15
- Another worm appears around Wave 25
- The final wave gives players roughly 70 seconds to finish remaining enemies
The wave rotation also became less predictable with the addition of newer bosses, including Chef, Botanical, Totem, Golf, Harpoon, Laser, Hydro, Captain, Knight, and Paradox Zobos.
Understanding Tatari Skills (Horde Mode Exclusive)
Tataris have skills specific to Horde Invasion, distinct from Battle and Boss Challenge modes.
Each Tatari can be upgraded 7 times, unlocking new skills at levels 3, 5, and 7. Every upgrade also grants stat improvements.
Skills remain consistent across an evolutionary line, with one exception: the base skill—the Tatari's standard attack used in other modes—carries over. Evolved forms are stronger than base forms, but they learn the same upgrade skills.
Pro tip: Evolve your Tatari before upgrading them in Horde mode. This gives you better stat bonuses without changing the skill configuration.
Best Tataris for Horde Invasion
Based on community consensus and tier list analysis, here are the top Tataris by role.
S+ Tier: Meta Priority
These Tataris are considered almost mandatory for high-level runs:
Dewgrub(Water) – The safest mode staple thanks to repeatable water coverage and long-fight value. Provides steady wave pressure throughout the run.

Buddi(Grass) – Raises the floor of almost every Horde board by smoothing weak lanes. Provides sustain and board stability.

Voltfawn(Lightning) – A top-tier carry with strong burst damage, paralysis utility, and one of the best damage profiles in the game. Provides control and carry damage.

Support and Control Specialists
Clucky (Grass) – Strong healing choice. Level 5 skill Chain Heal continuously heals weakened allies.
Capywata (Water) – Level 5 skill Jumbo Orange heals allies while providing both ATK and DMG boosts.
Cheerling (Lightning) – Arguably the most versatile support. Base skill Bunny Dance heals nearby allies while providing ATK and DEF boosts. Level 5 skill Just Dance periodically grants invincibility to nearby allies.
Droppit (Water) – Level 7 skill Sea Fog inflicts Super Fragile on all enemies simultaneously. Pair this with high burst damage for devastating combos against double boss waves.
Pure Damage Options
Zapup (Lightning) – Level 7 skill Gigavolt deals wide-range DoT damage.
Pyropup (Fire) – Level 7 skill Hellflame continuously summons powerful flame pillars in the surrounding area.
Frostnip (Water) – Level 7 skill Frost Path deals wide-range AoE damage with a chance to inflict Freeze.
Flarevix (Fire) – Shoots an intense fireball that explodes on impact, inflicting heavy damage.
The Chip System
Chips are randomized buffs/effects that players can gain during a Horde Invasion run.
Chip-bearing bosses appear every 5 waves(Waves 5, 10, 15, etc.), indicated by a chip symbol above their head. After defeating the boss, a popup appears with 3 chips to choose from.
Each player can hold a maximum of 3 chips(6 total across both players). Chips have different rarities (Rainbow, Gold, Blue), with rarer chips providing more powerful effects.
Notable Chip Effects
Photosynthesis– Obtain energizers every 5 seconds. Your Tatari can be upgraded to Level 8. (Rainbow: 4 energizers; Gold: 3; Blue: 2)
Bounty Hunter– Obtain extra energizers for each Zobo killed within 120 seconds.
Slot Machine– Randomly obtain Tatari from your formation. If you exceed deployment limit, randomly upgrade Tatari equal to the amount exceeded.
Element Forms(Water/Fire/Grass/Rock/Lightning) – Your Tatari of that element gain damage boosts (Rainbow: 40%; Gold: 30%; Blue: 20%).
Lawn Care– Generate 6 single-use lawn mowers at the bottom of the map. Once triggered, mowers kill 5 non-boss Zobos in front and deal damage equal to 50% of Max HP to bosses.
Equalizer– Reset all deployed Tatari to Level 4.
Center Spotlight– Zobo bosses will only appear in the middle 2 columns.
Count to Five– The first time you have 3 Level 4 Tatari deployed together, upgrade all of them to Level 5.
Roll of Fate– Obtain another chip of the same tier at random, plus immediate energizers.
Underdog– When your element is countered by the enemy, it is considered as countering the enemy instead.
New Recruit– Raise deployment capacity by 1 and immediately obtain energizers.
Chip Strategy Tips
- Prioritize chips that address your team's weaknesses– If your frontline is struggling, grab defensive or sustain chips.
- Rainbow chips are game-changers– Photosynthesis 3, Bounty Hunter 3, and Element Forms can dramatically swing a run.
- Coordinate with your teammate– Try to cover different chip effects rather than doubling up on the same ones.
- Don't ignore blue chips– Even basic chips like AFK (300 energizers for 90 seconds of auto-battle) can provide critical resource boosts.
Advanced Strategy: Surviving 35 Waves and Double Bosses

Core Principles
Wave stability comes first. If your lanes break before later waves, your boss damage never gets to matter. Focus on survival and control before overcommitting to damage.
Elemental coverage is non-negotiable. The success of Horde Invasion depends 100% on elemental coverage with your co-op partner.
Team Coordination
Playing with an active, communicating teammate yields much better results than random matchmaking. A coordinated team can:
- Cover all lanes properly
- React quickly when bosses appear
- Split roles (one player handles support buffs, the other focuses on DPS and crowd control)
Don't both use the same setup.Look at what your teammate is already using and fill the missing roles. If your teammate already has strong Fire damage, focus on Lightning, Grass, Rock, or Water coverage instead.
Positioning Tips
Move your formation before the Sandworm appears. The worm teleport mechanic at Wave 15 can devastate a static formation.
Move Tatari around often to help your teammate whenever a lane becomes overloaded.
Pull bosses closer intentionally when possible. Opening a path allows your DPS units to target bosses faster instead of wasting attacks on smaller enemies blocking the lane.
Place Bat on your ally's side for stronger buffs compared to keeping it on your own side. Don't forget to reposition it when you move your formation.
Upgrade Priority
If your Horde team already has damage, the next best investment is survival or control—not even more damage. Value slow, control, and healing more than you would in a short boss fight.
Using Frog as Main Fire Damage
Some players prefer running Frog as their main Fire damage source. A Tier 2 Frog already deals impressive damage, and pushing it toward Level 7 gives it enough power to handle large groups. Frog's attack can cover multiple lanes and several enemies in depth—excellent when the invasion starts throwing multiple enemies onto the field at once.
Sample Balanced Setup
A balanced Horde Invasion setup might look like:
- Frog– Main Fire damage
- Voltmare– Lightning damage
- Mantis– Grass damage
- Panda– Additional Grass damage
- Dun Beetle– Rock damage
- Tidian– Water damage
- Butterfly (Waveflutter)– Additional support against Water enemies
- Cheer Flutter (Cheerspring)– Front-line healing and support
- Bat– Team buffs
The exact formation doesn't need to be identical every time. Your available Critters, their tiers, and your teammate's setup should determine which units you bring.
Conclusion
Clash of Critters Horde Invasion is the ultimate test of teamwork and strategic planning in the game. Success isn't about having the highest-level Tataris—it's about elemental coverage, crowd control, sustain, and coordination with your teammate.
Don't hesitate to participate in this mode as much as you can—it's one of the best sources of daily rewards in the game. With the right preparation, teamwork, and Tatari choices, you'll be pushing into the highest difficulties and claiming those exclusive seasonal rewards in no time.
Good luck, and may your lanes never break! If you are looking to keep your resources flowing while building Snowcub and the rest of your roster, you can also check out Clash of Critters top up options through LDShop.






 TOP UP WITH DISCOUNT NOW
Rich Experienced Game Editor
Rich is a passionate gamer and strategy explorer who loves uncovering hidden mechanics, experimenting with team comps, and sharing tips that actually help players succeed. She has a talent for breaking down complex systems into easy-to-understand guides, making even the trickiest battles feel manageable. When she's not diving into virtual worlds, you might find her debating game lore, hunting for easter eggs, or enjoying a snack while plotting her next in-game strategy. Rich's goal? Helping fellow gamers have more fun while leveling up their skills.
![[New User Exclusive] 1st Purchase Deal - USD4.99 | Clash of Critters](https://shop.ldrescdn.com/rms/ld-space/process/img/cd91b89f479d466b8251e164e0adc8141790068258.webp?x-oss-process=image/resize,m_fill,h_160,w_160)