


In normal HSR content, Gepard is the polite Preservation wall who just wants everyone to survive. In Currency Wars, he tosses that identity aside and turns into a walking tactical nuke—enemies hit your team a few times, he charges up, and then drops one massive counter that scales off your entire squad’s shields.
This guide walks through the whole “Nuclear Gepard” meme run—how the talent works, what gear and bonds make it tick, and how to transition from early Aglaea carry into full shield-bomb mode. It’s a big-number, stress-relief comp rather than an A8 meta breaker, but if you’ve ever wanted your tank to delete a plane in one hit, this is the one.
Table of Contents
How the Gepard Shield Nuke Team Works

The core loop is simple in theory and surprisingly elegant in practice. Enemies attack my team, each hit adds a stack of charge to Gepard, and at four stacks he auto-casts a huge AoE stomp whose damage scales with 600% Gepard’s DEF and 200% of the sum of all shields on my side.
Because Currency Wars caps how much shield a character can stack, it doesn’t matter whether the shield comes from Gepard or his teammates; as long as the squad collectively hits that cap, his multiplier hits its upper limit too. That means I can hand almost all the shield-generating responsibility to other Preservation units and build Gepard himself like an DPS: high Crit Rate, high Crit DMG, and as much offensive scaling as possible.
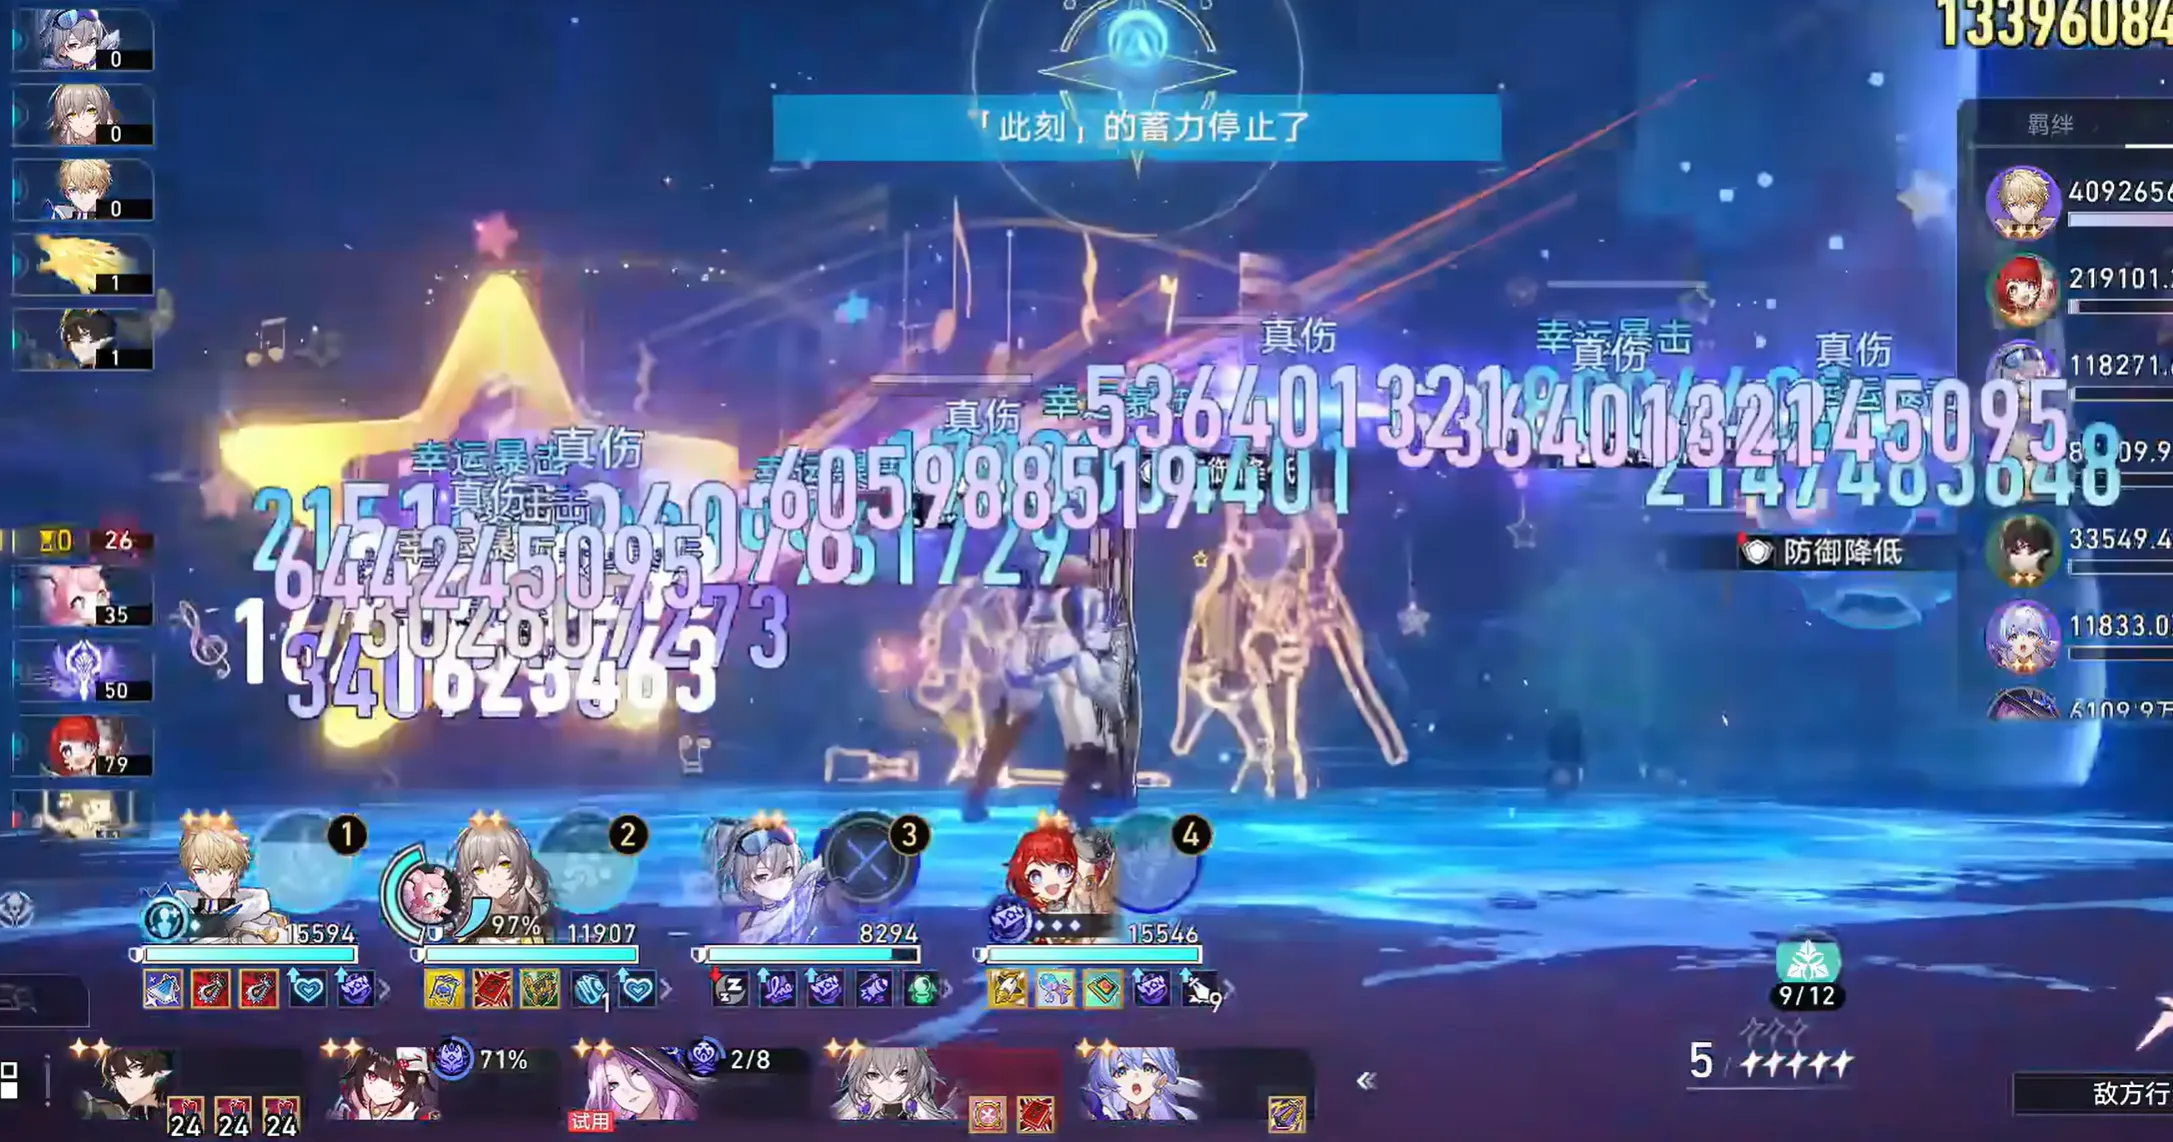
The twist is that he doesn’t benefit from acting more often. His damage doesn’t come from taking turns; it comes from reacting to enemy attacks. If I pump his Speed or constantly push him forward, I risk dropping buffs, letting shields expire, or triggering his Ultimate at bad moments.
The most consistent pattern I’ve found is to deliberately keep him slow, sit him at the back of the action bar with all buffs stacked, and let enemies take swings at my shielded team until the charge hits four and the nuke goes off.
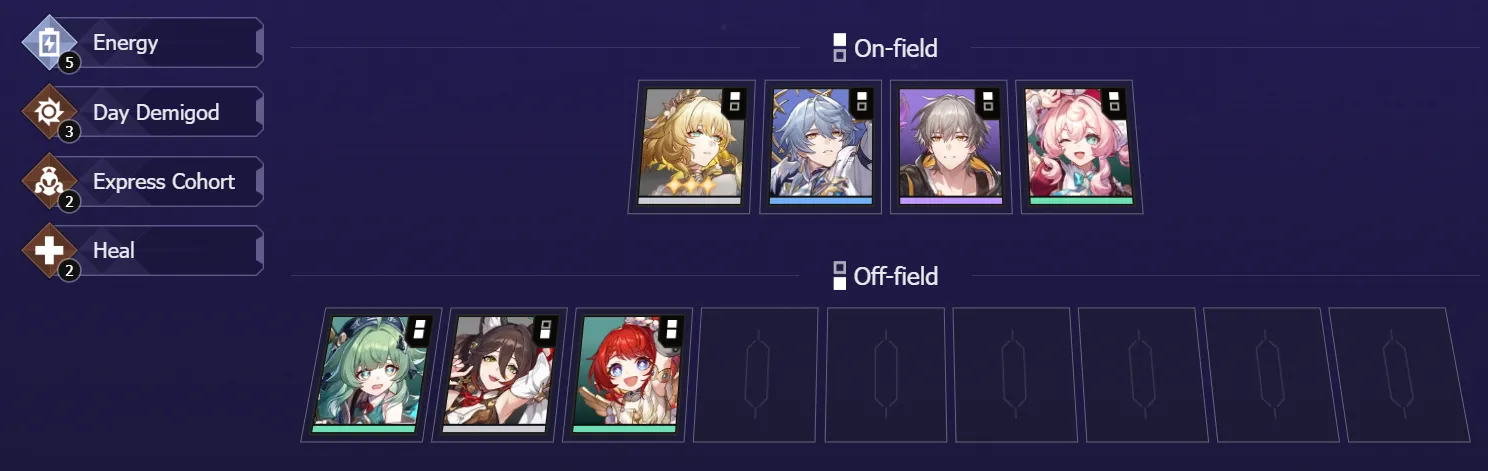
Gepard Shield Nuke Team Structure
|
On Field |
|||||
|
Gepard |
Trailblazer |
Sunday |
Cipher |
||
|
Off Field |
|||||
|
Silver Wolf |
Robin |
Tribbie |
|||
|
Dan Heng • PT |
Jade |
||||


- If you don’t have an AoE ATK Emblem, simply swap Robin for Argenti to complete the 3-piece AoE ATK Bond.
To make the nuke worthwhile, I want three things from the rest of the team: a lot of teamwide shielding, strong defensive debuffs on enemies, and a way to stabilize buff timing so Gepard doesn’t get dragged forward too much. In Currency Wars that points me toward a Express-Cohort-flavored Preservation shell, with allies who can constantly add shields and shred defenses.
One of the most important partners is Trailblazer. In the front row, Trailblazer’s Mem effectively adds another unit’s worth of shield to Gepard’s scaling, which is roughly a 20% independent bump to his multiplier once everything is stacked.
Paired with Express Cohort allies who improve his offensive ability, his stomp stops being “cute” and starts one-shotting entire waves. The beauty of this setup is that nobody cares who technically cast the shields: as long as the bar is full across the team, the bomb is primed.


Gepard Relics Requirement
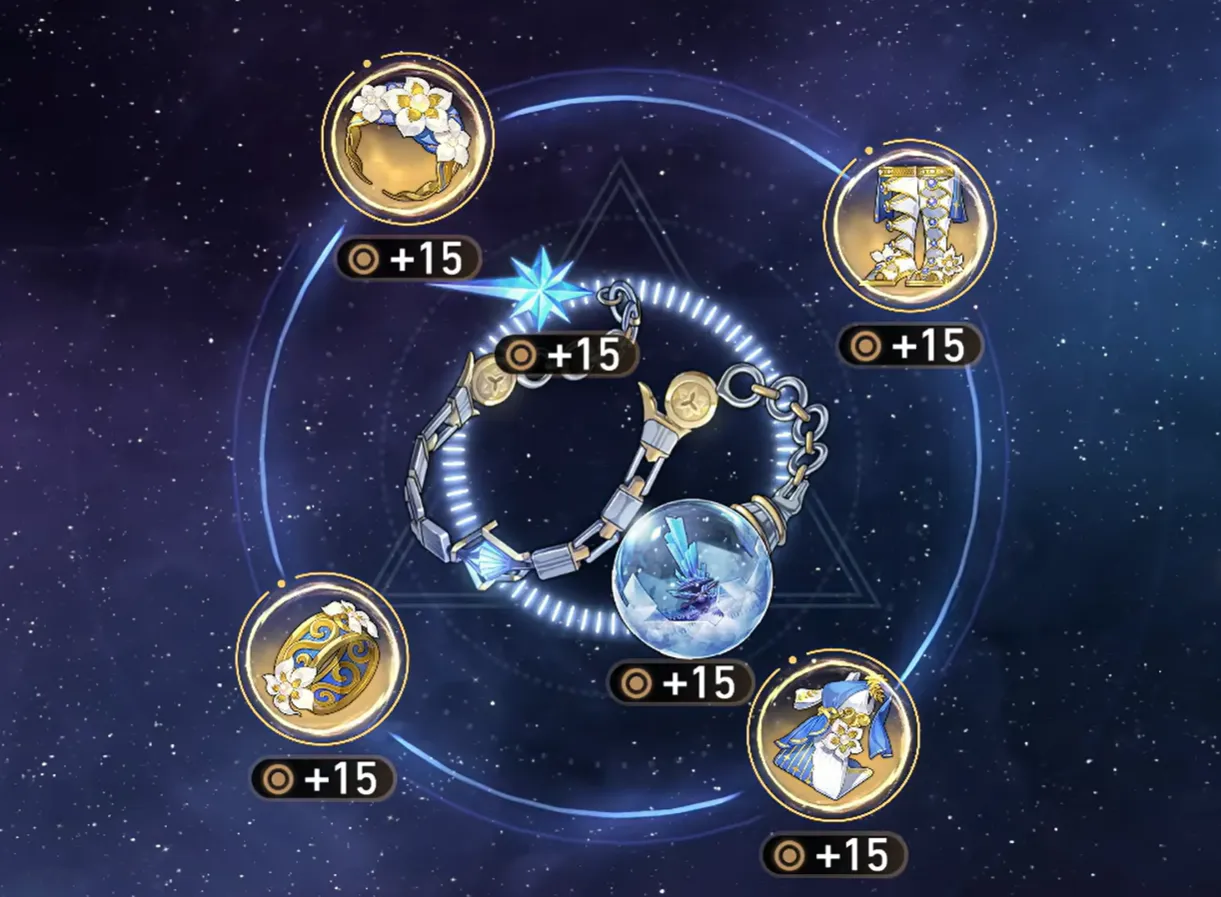
|
2-Piece Effect |
Increases Quantum DMG by 10%. |
|
4-Piece Effect |
Decreases the wearer's SPD by 8%. Before entering battle, if the wearer's SPD is less than 110/95, increases the wearer's CRIT Rate by 20%/32%. This effect also applies to the wearer's memosprite. |
For this build, Poet of Mourning Collapse is basically mandatory. Gepard’s own Crit Rate is almost zero, and even after I add every reasonable Crit buff from teammates, there’s still roughly a 30% Crit gap that I can’t fill in a clean way. The 4-piece Poet set fixes that perfectly: as long as his Speed stays under the threshold, he gets a massive flat Crit boost. That makes his single-hit nuclear counter far more reliable, since whiffing a crit on a one-shot build is catastrophic.
The Speed penalty is not a downside here—it’s exactly what I want. Trailblazer and Sunday action advance effects tend to drag Gepard forward, wasting his buffs before enemies have attacked four times.
His damage comes from waiting with full buffs and full shields, not from taking lots of turns. By pushing his Speed down so low that he sinks to the very bottom of the timeline (around 80), I can let Trailblazer and Sunday stack all the buffs at the right time, then watch him naturally fall behind everyone and stay parked there. Enemies get their hits in, charges reach four, and he detonates with every buff still active.
Best Investment Environment
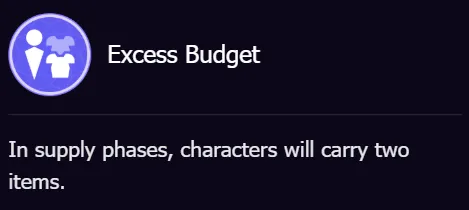
Excess Budget gives more item every supply phase, which is exactly what this team wants. I’m hunting for very specific tech pieces—High-Frequency Chainsaw for Gepard and Anti-Grav Boots for Dan Heng PT—on top of general damage and shield gear. Seeing twice as many items each time massively increases the odds of assembling those key parts before the late planes.
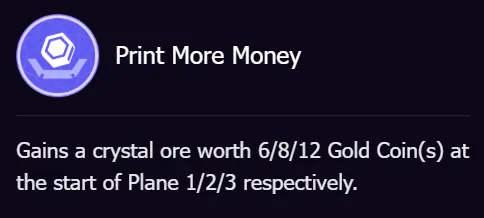
Print More Money solves the biggest structural problem of Nuclear Gepard: he’s a 4-cost unit with almost no early-game transition. I need to hit Level 8 quickly so I can actually roll him and his shield crew before Plane 3. The extra crystal ore each plane boosts my gold curve, lets me level earlier, and helps me assemble the full lineup in time for the comp to start working.
Best Investment Strategy
|
4-cost Reinforcement |
Interest Rate Increase |
Twin Primes |
|
Offers a steady flow of 4-cost characters, making it easier to reach Gepard early and strengthening the midgame naturally—no reroll spending required. |
Raises the interest limit and grants extra starting gold, perfectly matching the comp’s econ-heavy plan to rush levels 8–9 and hit its main 4-cost power spikes smoothly. |
Supplies additional EXP, letting the team climb levels faster without sacrificing economy—ideal for reaching higher-level shops sooner to pick up Gepard and Trailblazer. |


Best Equipment Set
This setup uses a very specific set of items to unlock the full nuke engine—each piece plays a clear role in maximizing Gepard’s counter damage.
|
Gepard |
High-frequency Chainsaw |
High-frequency Chainsaw |
Starcleaver Blade |
|
Dan Heng • PT |
Anti-Grav Boots |
Anti-Grav Boots |
Anti-Grav Boots |
|
Trailblazer |
AoE ATK Emblem |
Victory Banner |
Victory Banner |
|
Sunday |
Confidence Injector |
Perpetual Engine |


A Special Gift Just for You!
LDShop has a special deal for you—copy the exclusive code "LDSHOP5FF" and get a 5%OFF coupon for your next purchase! You can redeem the coupon by pasting the code in your Personal Center page, or redeem it directly at checkout. Please click the button below to top up now!


Discount code validity period: 2026.04.01 00:00:00 - 2026.07.31 23:59:59
Game Plan – Early, Mid, and Late
Early Game (Lv. 1–3)

In the early planes, I don’t even pretend this is a Gepard run. He’s a 4-cost unit with zero early transition, so forcing him before level 8 is pure pain. Instead, I treat the opening completely as an Aglaea team run. I use her as my main DPS, build safe bonds like AoE, Energy, or DoT, and let her handle every fight while I stabilize HP and econ.
My first major setup goal isn’t Gepard at all—it’s two Anti-Grav Boots, both equipped on Aglaea to speed up her turn cycle and keep her dominance in early fights. During this phase I stay disciplined: keep 50-Coin econ, level efficiently, and never roll deep for 4-cost units. Aglaea’s job is simply to escort me safely to level 8 with a clean streak and enough gold to pivot.
Mid Game (Lv. 4–7)
Lv. 4–7 are about setting the stage for Gepard, not fielding him yet. I continue running Aglaea as my primary damage dealer, but I start gathering the Preservation and other pieces that I will eventually need for the nuke core. I also keep an eye out for Sunday and Dan Heng • PT that help me reach the shield cap later.
The real goal here is simply to rush level 8 by 3-1. I maintain a healthy econ buffer, and only roll lightly if a shop is unusually high-value. As long as Aglaea keeps the streak alive, I’m happy. By the time I reach Lv. 7, I want two boots ready, a solid econ cushion, and most of my Preservation shell sitting in the roster—even if they aren’t on the field yet.
Late Game (Lv. 8–9)
When I hit level 8, the run truly begins. This is where I start rolling specifically for Gepard. He doesn’t need high star levels—1★ is playable, 2★ is comfortable, and anything above that is bonus—so I don’t waste gold chasing copies. Once I find him, I immediately re-tool my board:
- equip him with at least two High-frequency Chainsaws,
- swap Aglaea’s boots to Dan Heng • PT,
- bring Sunday and Trailblazer onto the field,
- and push toward level 9 to finish the roster.
From here on, the gameplay flips completely. I stop trying to take actions proactively and instead focus on stacking shields, stacking debuffs and controlling action order. Gepard sinks naturally to the back of the timeline, collects four charges, and fires his nuclear counter with full buffs intact.
Conclusion
If you’re still learning Currency Wars or trying to push A8 for the first time, this is not where you start. But if you already have a comfortable grasp of econ, bonds, and enemy affixes, and you’re looking for something wild to try after clearing your weekly runs, Gepard Shield Nuke Team is a genuinely fun side project. It flips your usual instincts—encouraging more enemy actions, slowing your “carry,” valuing shield cap over HP—and turns defensive play into a flashy, offensive spectacle.
And if you decide you want to mirror some of this chaos in your normal account, you can always give your roster a boost first. Topping up your Honkai: Star Rail Oneiric Shard safely and cheaply through LDShop means more warps, more options for both serious and meme teams, and more room to experiment with nonsense like one-shot shield nukes once you’ve finished your “sensible” runs.


 TOP UP HSR WITH DISCOUNT NOW
Henry Smith Experienced Game Editor
Greetings! I’m a veteran game editor and strategy guide creator with over a decade of experience exploring the worlds of action RPGs and gacha adventures. From the elemental battlegrounds of Genshin Impact, to the cosmic journeys of Honkai: Star Rail, and the fast-paced combat of Wuthering Waves, I dive deep into the mechanics, meta, and moments that define each game. What can you expect? In-depth guides, expert commentary, and practical insights to sharpen your gameplay and expand your understanding of the titles you love.
