


Season 2 changed everything for gear progression in Sword x Staff. The Refinement and Affix Transfer system arrived, and with it came a fundamental question every player must answer:How much are you willing to spend to perfect your gear?
This guide breaks down exactly how the system works, which affixes matter for each class, when to stop rolling, and how to transfer your best lines without wasting resources.
How Affix Transfer Works

Starting from Season 2 onward, players can transfer affixes (or reroll them) from a Mythic or better gear piece onto another Mythic or better gear piece. The action destroys the left-side item immediately—nothing is left behind, unlike dismantling with the Cauldron.
The Golden Rule: The inherited item must be the exact same type as the parent item. A sword inherits a sword; a tome transfers only to another tome, not to boots.
Within the same season, affix transfer costs zero Divinecraft Stones. As long as you have the gear, you can transfer as many times as you want. Do note that affix values scale with gear level—an ATK stat might jump from 2,084 to 3,577 simply because the destination gear is higher level.
To perform a transfer, you can either click the shortcut button on the gear itself or visit Micaela—the blacksmith girl—in Cinder Ridge.
Gear Refinement—Rerolling Your Lines
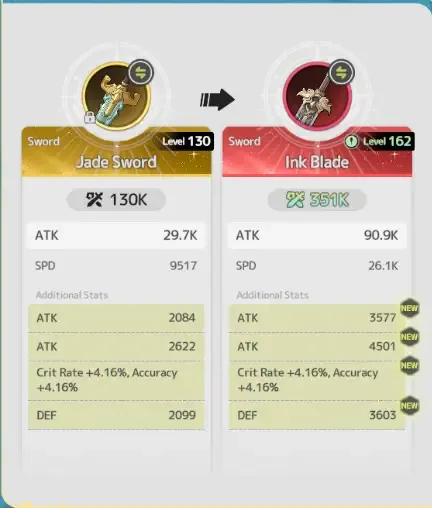
Unlike traditional MMORPGs where you grind gear and toss it when substats don't match, Sword x Staff lets you farm a piece, reroll affixes until you're satisfied, and keep it forever—if you can afford it.
To refine a gear piece, it must be Mythic or better. Click Enhance on the gear interface, then select the new Refine tab. The game displays four affix lines. Click Affix Preview to check the available pool and value ranges for each line.
The Cost of Rerolling
Locking or unlocking a line is free. You pay when you press the reroll button. Here's the cost breakdown:
|
Lines Locked |
Cost per Reroll |
|
0 |
100 Stones |
|
1 |
300 Stones |
|
2 |
1,200 Stones |
|
3 |
3,200 Stones |
Finding one good foundation is relatively affordable. Forcing a second, third, or fourth premium line around it is where the system becomes expensive.
Unique Affixes—One Rule You Cannot Break
Some affixes are marked with the Unique tag. Each gear piece can only contain one Unique affix. More importantly, if multiple equipped pieces have the same Unique effect, only one copy applies. Do not pay to duplicate the same trigger across your set.
For example, Wind Shield—which grants a shield based on max HP at the start of combat—can only appear on Helm/Armor/Boots, not on weapons or off-hand slots. If you have Wind Shield on two gear pieces, only one shield will be applied.
Important distinction: Gear effects are copies of Techniques, but they are not Techniques themselves. They won't trigger Technique-related effects. However, they do stack with Techniques and Charms—if you equip a Wind Shield Charm and have Wind Shield on your gear, both shields will stack.
Divinecraft Stones—Where They Come From
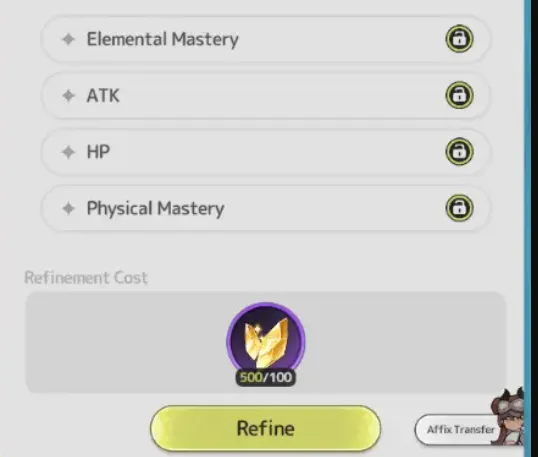
Divinecraft Stones are obtained by dismantling Mythic or better Gear/Shards. The conversion rates are confirmed:
- Mythic Shards: 50 shards = 100 stones (2 stones per shard)
- Divine Shards: 6 shards = 18 stones (3 stones per shard)
Before dismantling anything valuable, compare the conversion rate with your server's trading house. A shard may be worth using, selling, or saving instead.
Cross-Season Transfer—The Real Cost
The problem starts when you try to retain stats from a previous season to the current one. For example, if you have a god-tier Staff in Season 2 and want to keep those affixes in Season 3, you'll need to spend Divinecraft Stones.
Cross-season transfer is selective and expensive:
|
Affixes Carried |
Cost |
|
1 |
300 Stones |
|
2 |
1,200 Stones |
|
3 |
3,200 Stones |
|
4 |
8,000 Stones |
Any affix you don't select is rerolled randomly on the destination gear. That means an ordinary affix can technically be transferred, but that doesn't make it worth the price.
My recommendation: Carry one or two premium affixes. That's not a game limit—it's a value recommendation based on how sharply costs rise. Carry three or four only when the lines are exceptional, the destination piece is part of a long-term plan, and the cost won't damage your overall progression.

Before You Lock—Three Questions
Before locking any line, ask yourself three questions:
How Strong Is the Roll?
The same affix can roll at different values. Two copies of "Crit Rate + Accuracy" with identical names can have very different numbers. Always compare the number against the range in Affix Preview.
Does It Fit Your Class and Build?
- Speed to Attack is a natural fit for many Duelists
- Defense to Attack makes more sense when a Knight is already stacking defense
- A rare line is not automatically a good line if your build cannot use it
Will the Condition Actually Be Active?
- PvE and PvP bonuses only work in their intended modes
- Damage against debuffed enemies requires reliable debuff uptime
- Airborne, frozen, or stun damage becomes much weaker when a boss resists control
Rarity matters. On one weapon slot I recorded, an ordinary line displayed a 4.75% rate while a compound line displayed 0.343%—making that specific compound roll about 14 times rarer. High-value compound affixes deserve more protection than ordinary stats you can find elsewhere.
Class Affix Priorities
The four classes in Sword x Staff—Duelist, Knight, Sorcerer, and Sage—each have distinct priority lists. Here's how to rank affixes for each.
Duelist (Melee DPS)

The Duelist runs on Crit Rate as its core stat. Priority order: Crit Rate → Crit Damage → Accuracy → Block.
S-Tier:
- Double Crit (Crit Rate + Crit Damage)
- Speed to Attack (when your speed supports it)
- Technique Damage to Debuffed Enemies
- Crit Rate + Accuracy (for PvP or block-heavy content)
- HP to Attack / Defense to Attack (if your stat distribution makes conversion stronger than Speed to Attack)
A-Tier:
- Strong single crit rolls
- Accuracy
- Dodge
- Dedicated PvE/PvP pairs (when gear is built for that mode)
- Double Block (for a committed defensive duelist)
B-Tier:
- General defensive combos (Quick Resistance + Block, Damage Resistance + Healing Boost)
- Blazing Burst, Shock Blast, Surging Blast (build-dependent)
Simple Duelist Rule: Establish crit, crit damage, accuracy, and the correct attack conversion before paying heavily for flashy special effects.
Sorcerer (Ranged AoE Nuker)

Sorcerer is the strongest Tier 2 class and the reason many commit to the Mage path early. It leans entirely into ranged area damage.
S-Tier:
- Double Crit (safest foundation)
- Speed to Attack / HP to Attack (when those stats are developed)
- Technique Damage to Debuffed Enemies
- Defense to Attack (only if defense is high enough)
- Crit Rate + Accuracy (PvP where block shuts down damage)
A-Tier:
- Dodge Chain (when build consistently interacts with dodge)
- Dedicated monster/player pairs (on correct gear sets)
B-Tier:
- Single crit, single crit damage
- Blazing Burst, Surging Burst
- Dodge
Sorcerer Rule: Build the reliable damage engine first, then add a trigger effectonly when your skills can activate it consistently.
Knight (Tank/Defender)

The Knight class excels in survivability, using consistent blocking and Rebound to push through difficult content. Knight is where priorities change the most.
S-Tier (Tank Knight):
- Double Block (premium line)
- Crit Resistance + Block
- Crit Rate + Accuracy (on an offensive knight)
- Shield Damage Reduction (when available on the relevant slot)
A-Tier:
- Additional Block
- Damage Resistance + Healing Boost
- Attack conversion matching your build (Defense to Attack is the natural starting point)
- Double Crit and dedicated PvE/PvP pairs (damage-focused knight)
Knight Rule: Decide whether the piece belongs to your tank set or damage setbeforeyou lock anything. Trying to make every piece do both jobs can leave both builds weaker.
Sage (Support / Hybrid Caster)

Sage is the support half of the Mage split, built around shielding, healing, and debuffs that amplify your team's damage. It needs two separate priority listsbecause damage Sage and support Sage solve different problems.
Damage Sage (S-Tier):
- Crit Rate + Accuracy
- Technique Damage to Debuffed Enemies
- HP to Attack / Defense to Attack
- Double Crit (especially after accuracy is sufficient)
Support Sage (S/A-Tier):
- Damage Resistance + Healing Boost
- Double Block
- Quick Resistance + Block
- Strong Healing Boost rolls
- General Block, single crit rate, single accuracybelong in A or B tier depending on whether the piece is for damage, support, or PvP.
- Summon Damage / Summon Defenselines are build-dependent—useful on a real summon setup, but should not replace core stats just because Sage has access to summons.
Sage Rule: Label the gear asdamageorsupportfirst, then judge the affixes. A great support line can be a poor damage line, and the reverse is also true.
Transfer Strategy
Same-Season Transfer (Free)
- The two pieces must be eligible Mythic or higher gear of the same equipment type. The material gear goes on the left and is consumed; the base gear goes on the right and survives.
- Cost: 0 Divinecraft Stones
- All affixes inherit onto the base gear
- Percentage affixes keep their values; flat stat affixes scale to the base gear's level
- Locked gear cannot be selected for transfer—use this as protection during inventory management. When ready, unlock only the intended material and base gear. Confirm material is on the left, then relock the surviving base gear afterward.
Cross-Season Transfer (Expensive)
- Reserve cross-season slots for rare, high-roll lines that would be painful to recreate. For most players, carryone or twopremium affixes.
- Before the season ends, mark your transfer candidates early.Do not wait until the final day and decide under pressure.

Final Word
The goal of gear refinement isnotfour gold-looking lines on one item. The goal is to build affixes that:
- Match your class
- Activate in content you actually play
- Remain valuable enough to transfer when your gear changes
Start with one premium foundation. Improve the weakest piece next. Save cross-season transfers for the lines that are truly difficult to replace.






 TOP UP WITH DISCOUNT NOW
Rich Experienced Game Editor
Rich is a passionate gamer and strategy explorer who loves uncovering hidden mechanics, experimenting with team comps, and sharing tips that actually help players succeed. She has a talent for breaking down complex systems into easy-to-understand guides, making even the trickiest battles feel manageable. When she's not diving into virtual worlds, you might find her debating game lore, hunting for easter eggs, or enjoying a snack while plotting her next in-game strategy. Rich's goal? Helping fellow gamers have more fun while leveling up their skills.
![[New User Exclusive]Monthly Pass | Sword x Staff](https://shop.ldrescdn.com/rms/ld-space/process/img/489facd0428c4d718684893a03204ab61787711772.webp?x-oss-process=image/resize,m_fill,h_160,w_160)